

Windows updates are a critical part of Windows Operating System. These updates bring much-required security patches, driver updates, more features, and stability for the system. While the Windows update process is seamless in most cases and for most users, there can be a case where you may see the error code 0x80070005 while installing Windows updates.
 |
| error 0x80070005 windows 10 |
The Windows update error code indicates that the system user doesn’t have the required permission, or the system update is missing some critical files that are required for installing the update.
This may also indicate an underlying issue with your hard drive such as a bad sector which corrupts the system or update files downloaded and saved on your storage media.
Steps to fix the Windows Update Error Code 0x80070005
Follow the steps in the given sequence to fix the Windows error 0x80070005 without data loss or any further complications.
Description and Symptoms
The error messages, alerts, warnings, and symptoms below are tied to this error.
Symptom 1: 0x80070005 error screen
The 0x80070005 error usually appears during Windows Update or by specific applications because of DLL files permission being denied, but it can also be caused by any of the following:
- Malware or virus infections
- Settings to Windows Update not being configured correctly
- Issues with Administrative rights
- Firewall software
- Causes of this Error
This error has been known to occur as a result of one or more of the following:
Cause 1: Windows access rights are not configured correctly
The most common cause of this error is a Windows application that attempts to read or write a key file, but the access denied by Windows ACL(Access control list).
Fixing “0x80070005” on Windows
Fix #1: Allow user full control
If the 0x80070005 error is caused by a specific application, the issue may be from its folder permissions.
The following steps are for Windows 8 or Windows 8.1 users:
- Open Run
- Type:
- C:\Users\USERNAME\AppData
- Click OK
- Right-click on the Local folder
- Click Properties
- Go to the Security tab
- Click “Edit -> Add”
- Type “Everyone”
- Click “Check names -> Ok -> Full control”
- Click OK to save the changes
- Restart your computer
Replace C: with the letter of the drive where Windows is installed. Also replace USERNAME with the username of the account you’re logged in.

After verifying that this fix works, you should attempt to narrow down which folders this should be applied to, as it is never a good idea to leave the ACL settings wide-open in this manner.
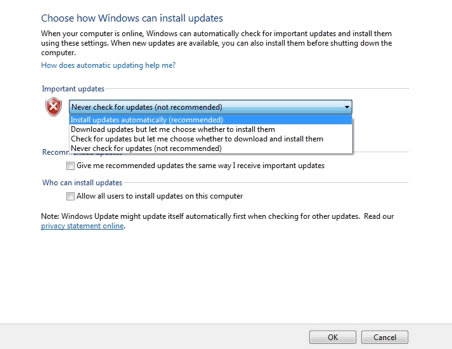
Fix #2: Configure Windows Update Settings
One of the easiest fix for the 0x80070005 error is to configure Windows Update settings to allow automatic updates.Make sure you’re logged in as an Administrator
Follow these steps:
- Click Start
- Type update in search box
- Select Windows Update from the search results list
- Click Change Settings
- Select Install updates automatically (recommended) at the Important Updates section
- Set a schedule when the updates are going to be installed
- Click OK

If your Windows Firewall settings are too strict, the 0x80070005 error might appear even if your Windows Update settings are set to automatically install updates.
To fix this, follow these steps:
- Click Start
- Type firewall in the search box
- Select Windows Firewall from the search results list
- Choose Allow a program or feature through Windows Firewall from the left side
- Click Allow another program
- Click Browse
- Look for the svchost.exe file
- Click Open
- Click Add
- A new program called Host Process for Windows Services should be in your list.
- Click OK

Use Windows Updates Troubleshooter

For Windows 7 & 8
- Open Control Panel
- Click on System and Security >Troubleshooting and then click Fix problems with Windows Update
- Click Advanced
- Select Apply Repair Automatically and then click ‘Run as Administrator.’
- Click Next and let it finish
In a Windows 10 PC,
- Press Windows + X and click ‘Settings.’
- Go to ‘Update & Security and click on Troubleshoot
- Click on Windows update
- Click ‘Run the troubleshooter’.
- Grant admin permission and follow the troubleshoot wizard to apply fixes
- Step 5: Run SFC

To run the SFC scan,
- Open the command prompt in Windows PC
- Type sfc /scannow and hit Enter key.
- Wait for a while till the scan and repair process is finished
Step 6: Scan for Virus and Malware
Run a malware scan using the inbuilt Windows Defender app. Make sure the app is updated. However, if you can, get a premium subscription or trial version of the popular malware scanner—Malwarebytes—to scan your system for malware infection.
After the scan, just restart your PC, then download and install the Windows Updates. If you still see the same error, manually install the Windows updates.


![[No Verfication] Dreamarket.App Dream League Soccer 2020 News Proof 999,999 Diamons and Coins](https://lh3.googleusercontent.com/blogger_img_proxy/AEn0k_tLg_J6lkH6Oo9j8GER6g2Q8qFac6p3HwUhsiGlDL7vrCQZo_3n0qWbott3iRJaXEBBwLzYNj6HuTqR9l7dG_cT4OUAfP38o85edpMtbT_w5K4Are6L4y8=w100)


0 Yorumlar